THE KREVAYA GUIDEBOOK
How to use
Krevaya
Create in Studio, review in Posts, and deliver a resource with Convo. Learn the controls, follow the work between them, and know what to check when something stops.
Find an answer in this guide
Search the controls, tasks, and troubleshooting steps.START WITH ONE POST
Follow one creation through Krevaya
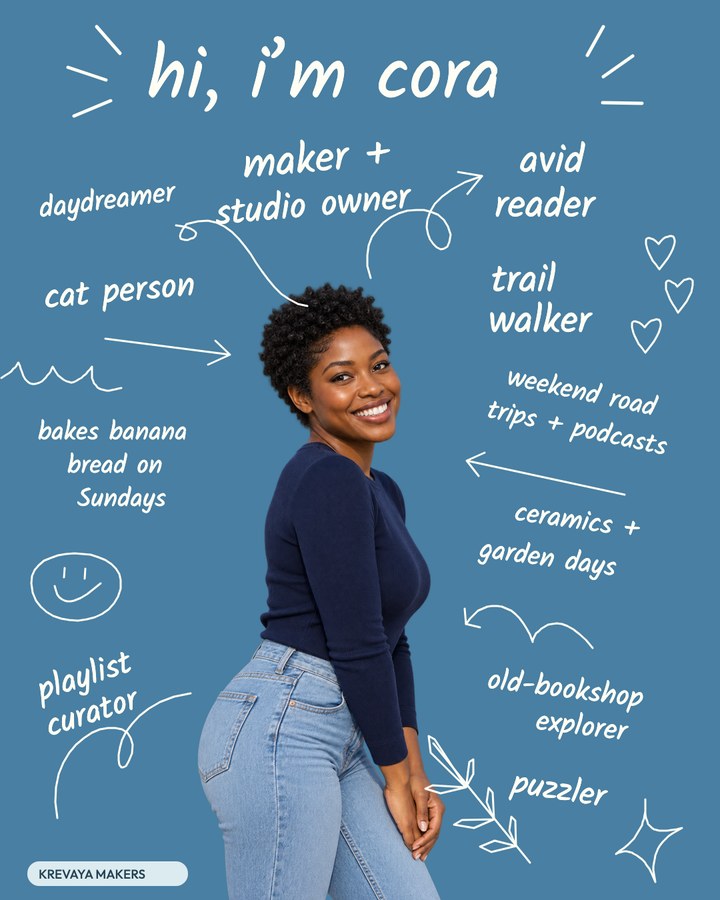
The example is Cora Studio’s maker introduction, built from Bluebird Maker Notes. The same artwork appears in Studio and in the post review below.
- 01
- 02
- 03
- 04
Check the result
Look for Published and inspect the live destination. Trace any hold or error.
Read the status →
Chapters 10 topics
Set up the brand you will publish as
A brand holds your identity, connected accounts, voice, and publishing preferences. Select that brand before connecting a channel or creating content. All brands is useful for seeing work across brands; choose one brand when a task needs a specific owner.
- WHERE
- Brand switcher → Brands · Channels
- ACCESS
- Free: one brand and one connected account. Paid plans add capacity.
What should I configure first?
Select or create the brand.
Use the brand switcher, then open Brands. Add its name, logo, primary color, and topic. If you work for several clients, check the selected brand before each connection; the account name alone does not tell you which brand will use it.
Connect the actual publishing destination.
Open Channels and complete the platform’s connection form. For Facebook, choose Connect via Meta and the intended Page. Check the account that appears afterward. A Pinterest board, YouTube visibility choice, or other per-post setting may still be required in the composer.
Check the time zone and publishing mode.
Check Settings → Publishing before your first schedule. Start in Review if you want to approve drafts yourself. Review allows approved and scheduled posts to publish; Off pauses automatic publishing.
Brand Kit, Brand Memory, and voice: what changes what?
| Control | What it changes | Where to set it |
|---|---|---|
| Brand Kit | The supported visual accents in your creation. | Brands; apply it inside Studio. |
| Brand Memory | Audience, positioning, facts, and preferences for supported AI tasks. | Settings → Brand voice → What Krevaya knows. |
| Your writing examples | Examples of how you write, separate from a template’s colors. | The Memory tab in Brand voice. |
Audience: people buying their first handmade ceramics. Core message: show how the piece is made and what it is useful for. Useful facts: small-batch studio, hand-finished surfaces, care instructions on the website. Writing preference: name the material and process; avoid invented scarcity.
This gives an AI draft specific material to work with. On Essentials, write the caption yourself; setting a logo or brand color does not turn on AI.
Make an editable creation, then turn it into a post
Studio saves an editable creation: its pages, text, photos, shapes, and other layers. A post adds the destination, caption, and publishing state. Use Post this when the artwork is ready, then check the resulting post in Posts.
- WHERE
- Studio → open a creation
- ACCESS
- New Studio creations, premium templates, and Brand Kit: Essentials and up.
How do I edit a template without flattening it?
Choose the format and template.
Pick the destination size first. In the Bluebird Maker Notes example, the portrait, handwritten labels, arrows, and ornaments are separate objects. Replace the sample identity and details with your own; keep the composition while you decide what to change.
Select the object you want to change.
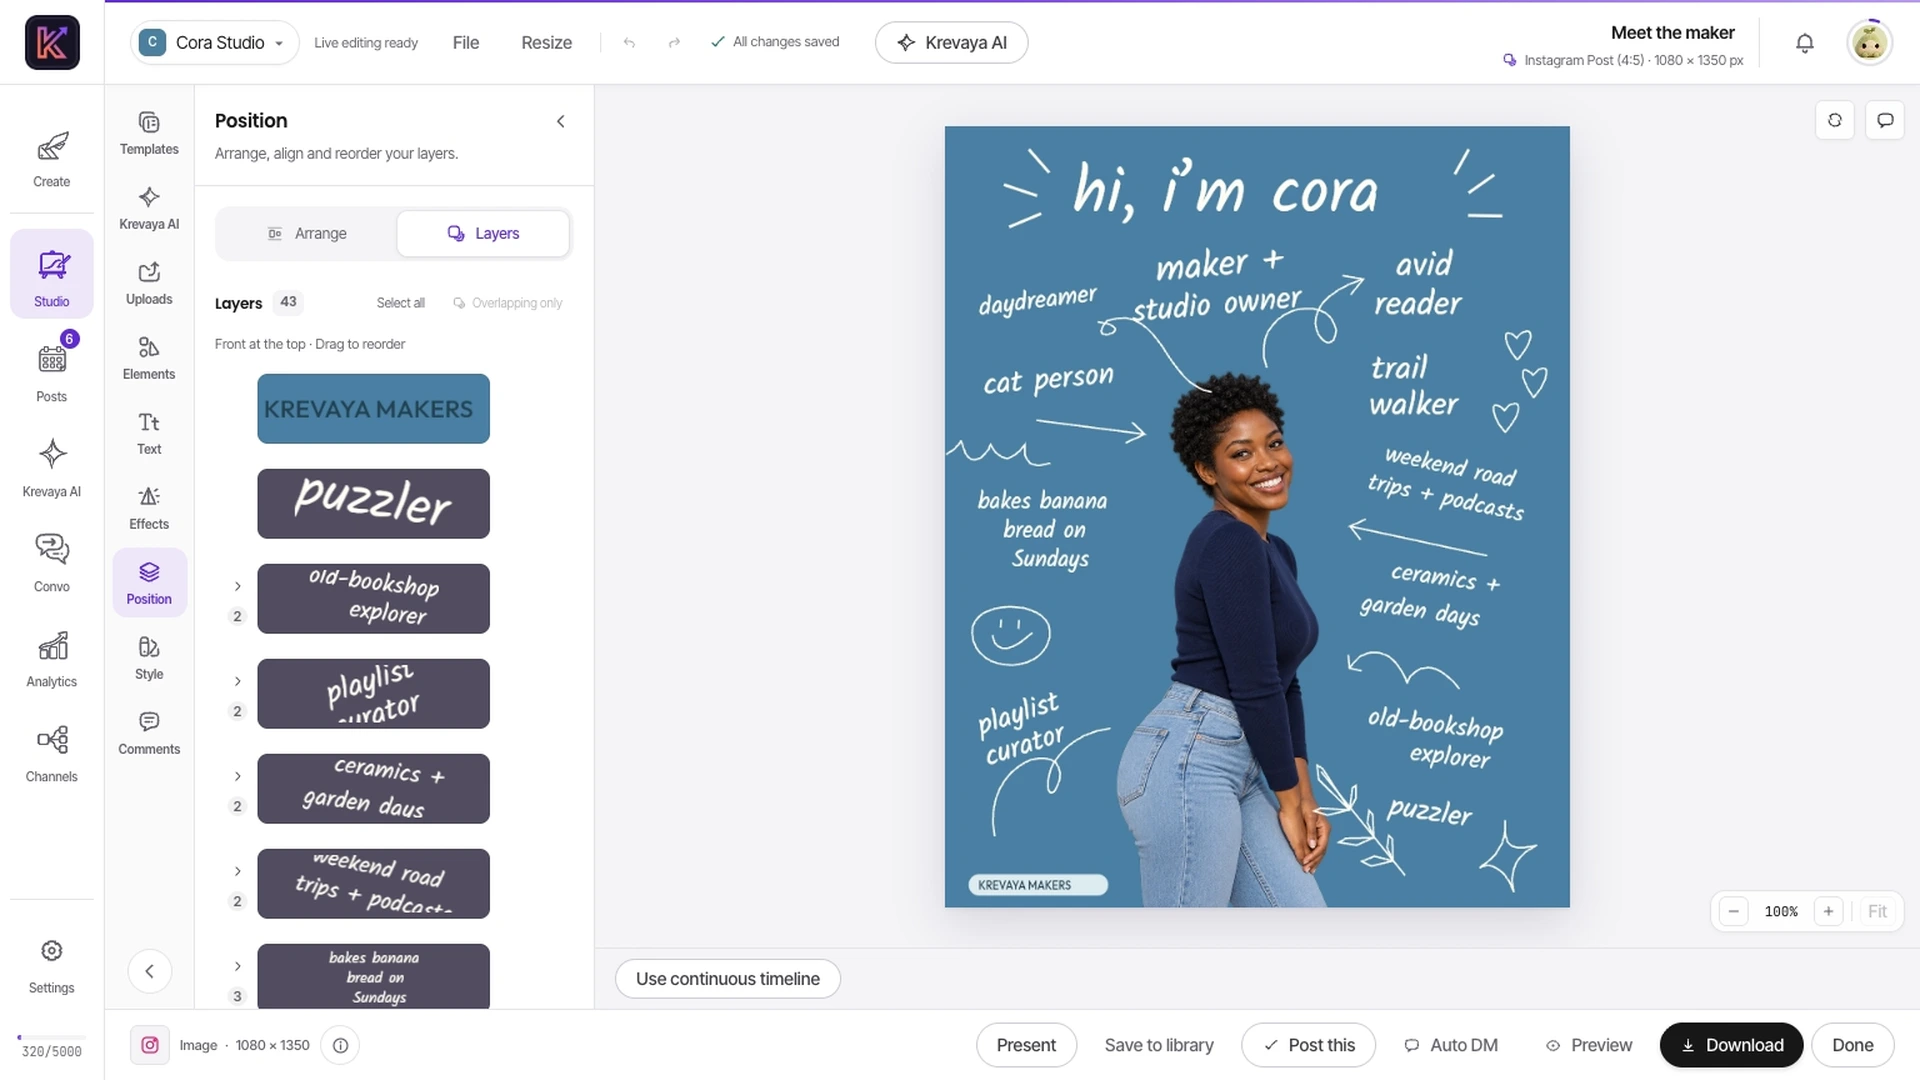
Click it on the canvas, or use Position → Layers when objects overlap. Edit text, replace a photo, change its crop, or reorder the layer. Lock elements you want to leave in place. Uploads brings in your media; Elements and the sketch tools add editable objects.
Apply Brand Kit and inspect the result.
Brand Kit changes the template’s supported accents. It does not recolor every photo or replace the layout. Check text contrast against the new color. Reset restores the authored colors; use a layer’s own controls for an individual manual edit.
Review every page, then choose the output.
For a carousel, check the cover, page order, and final call to action. Wait for All changes saved. Download creates a file; Save to library makes reusable media; Post this starts the post workflow. Check the resulting post separately before scheduling.
What is the difference between a creation, an asset, and a post?
| Item | Contains | Use it for |
|---|---|---|
| Creation | Editable pages and layers, including video timelines. | Changing the artwork later in Studio. |
| Asset | An image, video, or audio file in your Library. | Reusing media in another creation or post. |
| Post | A channel’s caption, media, status, and schedule. | Reviewing and publishing to that destination. |
What happens when I use a community template?
An approved community template becomes your own editable copy. Customize that copy without changing the published template. A submitted template is a visual snapshot reviewed by a platform administrator; editing your source creation afterward does not rewrite that snapshot. Pending submissions are not a public template library.
Keep reusable photos and exports in Studio’s Library. New AI images are a separate generation action on an AI plan, with their own credit cost.
Edit the timeline and check the exported MP4
Video uses the same Studio creation model, with timed visual and audio clips. Standard short-video creations run up to 180 seconds. Manual editing and MP4 export start on Essentials; generated captions and other AI edits start on Plus, and Auto cut starts on Pro.
- WHERE
- Studio → video creation
- ACCESS
- Manual video: Essentials · AI edits: Plus · Auto cut: Pro
How do I trim, split, and time a video?
Arrange the tracks.
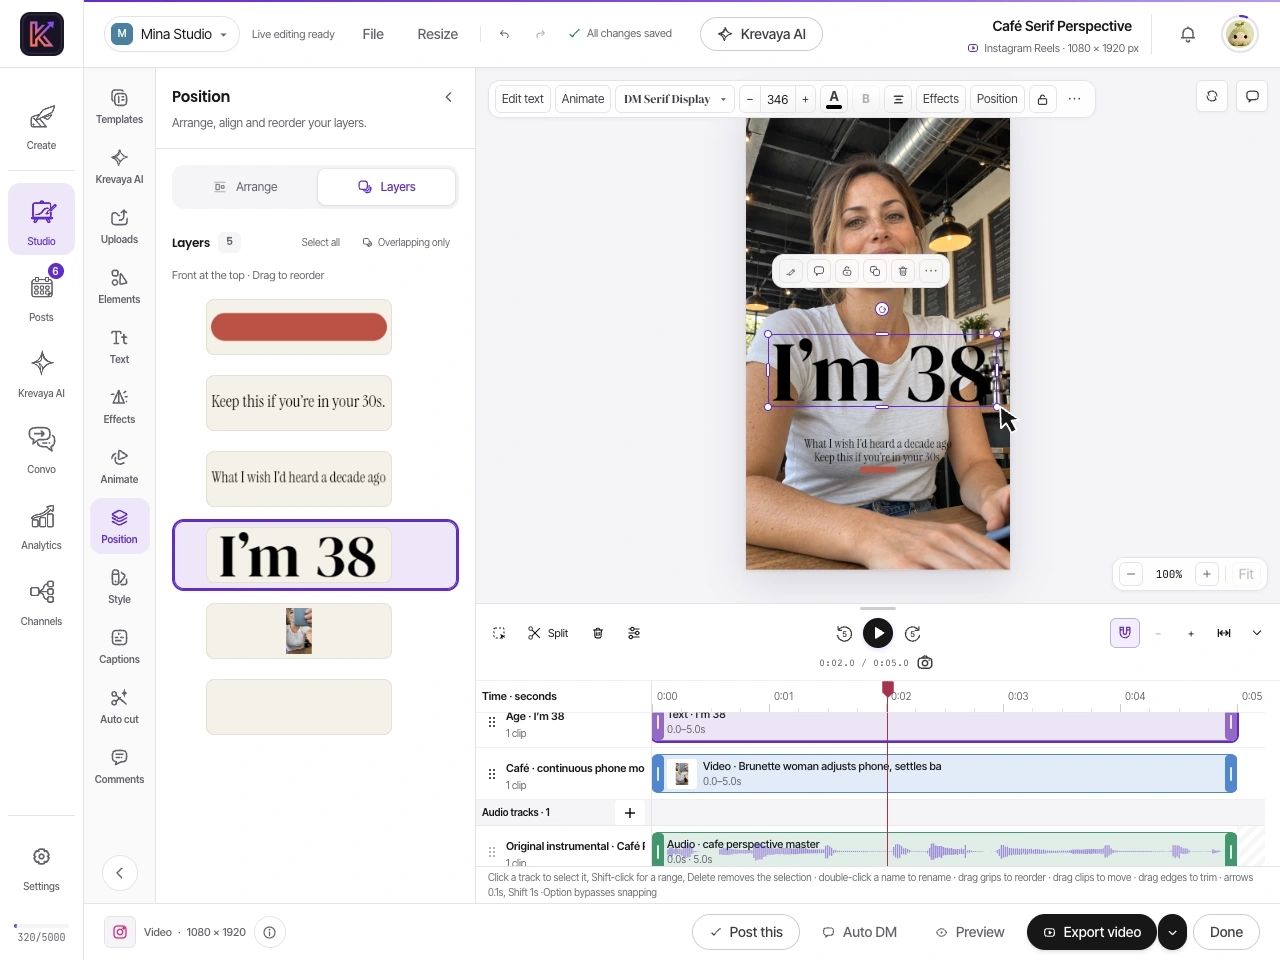
Start from a video template, upload, or Library item. Drag clips to their start times and trim their edges. Higher visual tracks sit in front of lower tracks. Clips on one track cannot overlap; use another compatible track for an overlap.
Split at the playhead.
Select one unlocked clip and place the playhead inside it. Choose Split, or press S with timeline focus. A video split needs loaded source metadata, looping turned off, and at least 0.1 seconds left on either side. Read the disabled control’s explanation if it is unavailable.
Check captions and audio against playback.
You can type captions on Essentials. With an AI plan, proofread generated captions and their timings. Check names, numbers, and the last spoken word. Use volume, fades, and ducking to keep speech audible. Space plays or pauses the timeline.
Does Auto cut create a finished video file?
Auto cut creates editable clips on the timeline. Choose a 15, 30, 60, or 90-second target from a source up to one hour long. Its Pop, Clean, and None caption choices control the first result. You can keep an intro, remove silences and filler words, and request a vertical reframe. Speaker tracking depends on whether a usable speaker was detected.
In the transcript panel, change which sentences to keep and choose Update the timeline. This reuses the transcript and replaces Auto cut’s own clips and captions without another transcription. Export is still a separate step.
| Check | Why it matters |
|---|---|
| All changes saved | Export the saved version you intended. |
| One export at a time | Only one video export can run per user. Wait for the active export to finish. |
| Play the exported MP4 | Listen for missing audio and inspect captions, framing, transitions, and the final frame. |
| Post this | Uses the latest export, or opens the export panel if there is none. Complete the destination’s fields before scheduling. |
Review the result before saving or applying it
Krevaya AI is the same assistant in the main conversation, Studio, the composer, and Convo. Draft requests produce reviewable results in the conversation. Save the drafts you want to keep; use Apply for supported creation edits. A request for copy is not an instruction to publish it.
- WHERE
- Krevaya AI · contextual assistant panels
- ACCESS
- Plus and up. Free and Essentials do not include Krevaya AI.
What should I ask Krevaya AI?
Draft three Instagram captions introducing Cora Studio’s handmade ceramics. Use the brand’s saved voice. Mention the making process and invite readers to say what they are working on. Keep each caption under 100 words. Do not invent product availability or prices.
| Result | Your next action |
|---|---|
| Post drafts or a week of posts | Read the conversation cards. Choose Save to Drafts on the ones you want, or Save all. Unsaved proposals are not posts in your queue. |
| Image or carousel design drafts | Inspect the options and choose the draft to turn into an editable Studio creation. |
| An edit to a creation or video | Review the target and proposed changes, then Apply. Check the result before continuing; supported edits include Undo. |
| Scheduling, sending, or publishing | Review the specific action and destination. These actions use their own confirmation controls. |
For an article or YouTube source, use repurposing and check that the source was actually read. For an account question, name the brand and period: “Which of Cora Studio’s posts performed best in the last 30 days?” is a narrower task than “What should I post?”
How do Routines differ from automatic publishing?
Routines live on Krevaya AI and belong to one selected brand. A schedule routine runs on chosen days and times in your account’s time zone. A feed routine watches RSS, Atom, or a supported YouTube channel feed; it starts with new items and does not turn the existing feed backlog into posts.
Choose the trigger and source.
Set a schedule, feed, or supported engagement threshold. Give a scheduled routine a specific topic or use the brand’s niche. Select the brand before creating it.
Choose the output.
A drafting run can write one to five posts for its selected platforms or Lineup. A Lineup is read again when the routine runs, so changes to its connected channels affect future runs.
Inspect the drafts in Posts.
Drafting routines do not approve, schedule, or publish their posts. Their drafts remain for review even when the brand uses Auto publishing. A run without enough plan allowance is skipped; check the reason before running it repeatedly.
Understand what will publish, and when
Posts holds the caption, media, and delivery settings for each destination. Approval makes a post eligible to publish. The schedule, brand mode, required channel fields, and publishing limits still determine whether it can go out.
- WHERE
- Posts → List or Calendar · Settings → Publishing
- ACCESS
- Manual posting and scheduling: Free and up. Lineups and best-time suggestions: Essentials and up.
How do I take a Studio creation through review?
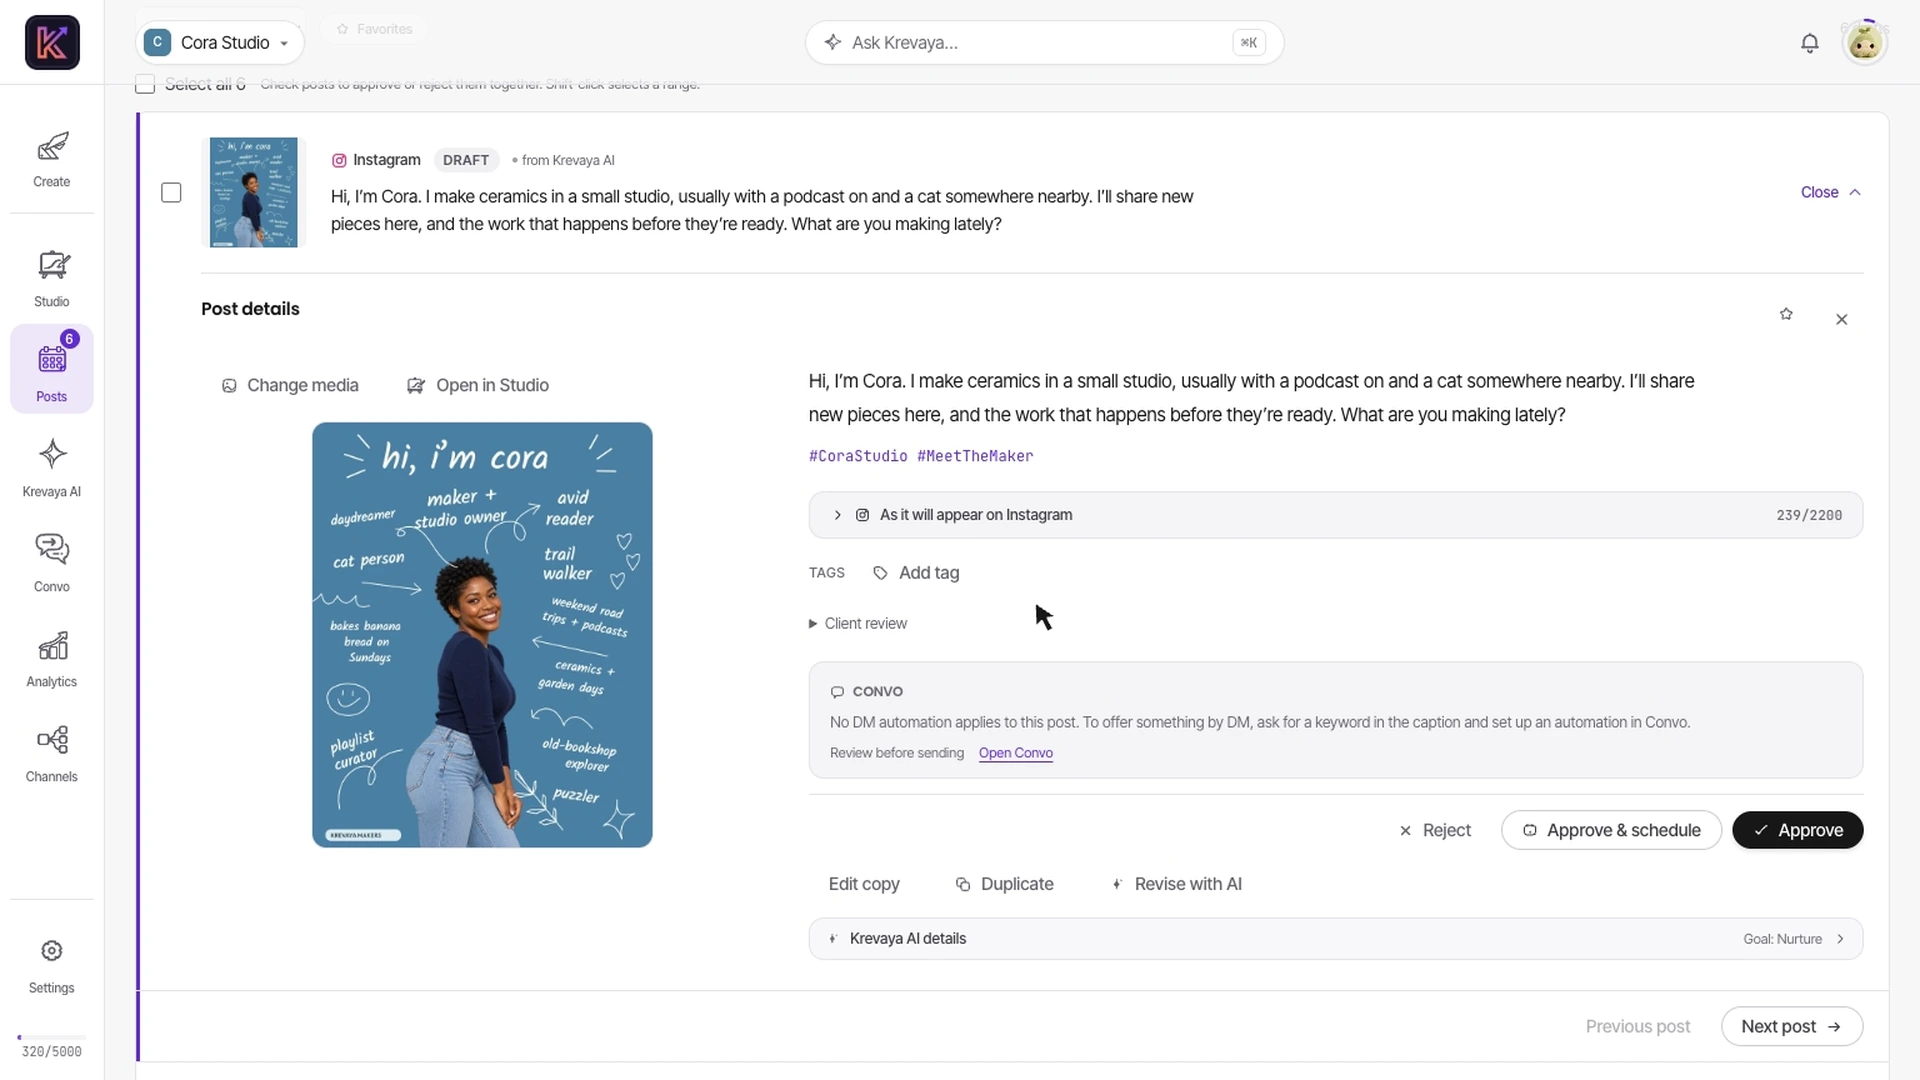
Open Post this, or Create → Write a post.
Select the destination and inspect its preview. A Lineup fills in its group of channels, first comments, and stagger settings; each platform can still be edited. Review each channel’s version when posting to several destinations.
Save and inspect the draft.
Use Save as drafts while the copy or media needs work. Open it in Posts to check the account, caption, links, media, and required fields. Review mode keeps ordinary drafts waiting for approval; Auto can approve eligible drafts automatically.
Choose Approve & schedule for a specific time.
Check the date, time zone, and destination. You can also drag an eligible draft from Needs review into the Calendar. A refused time leaves the draft in review; resolve the conflict or choose another time.
Verify the published result.
Check the status after the scheduled time, then open the live-post link when available. Publishing means the send is underway. For Held or Failed, inspect the reason on that post before creating a duplicate.
What do Review, Auto, and Off actually do?
| Mode | Drafts | Automatic delivery |
|---|---|---|
| Review | Wait for your approval. | Approved and scheduled posts can publish. |
| Auto | Eligible ordinary drafts can be approved within the brand’s limits. | Follows schedules and channel requirements. Routine drafts remain for review. |
| Off | Pauses new automatic drafting. | Pauses automatic publishing, including scheduled posts. Inspect anything already in Publishing. |
Pick a time, Next free slot, or Best time?
| Option | Use it for | Check first |
|---|---|---|
| Pick a time | A launch, event, or fixed deadline. | Time zone, required channel fields, and any conflict or limit refusal. |
| Next free slot | The brand’s normal posting cadence. | Active weekdays, times, and capacity. The search looks up to 14 days ahead. |
| Best time | Suggestions based on available engagement history. | The account and sample information. Use an explicit time for a deadline. |
Publishing limits combine the brand’s setting, the plan’s fair-use allowance, and the platform’s rules. Most daily checks use a rolling 24-hour period, not a midnight reset. X has a monthly allowance instead. The posting-limits reference lists current platform values.
What should I do when a post does not publish?
| Status | Meaning and next check |
|---|---|
| Draft | Still needs a decision. Read it and complete the destination’s settings. |
| Approved | Eligible to publish; inspect the schedule, available slots, and brand mode. |
| Scheduled | Has a planned time. Check Off mode, account health, and any hold if the time passes. |
| Publishing | A send is underway. Check the existing attempt before starting another copy. |
| Held | A limit, platform pause, or other eligibility check blocked delivery. Resolve the stated reason. |
| Failed | Inspect the error, correct its cause, and use Retry publish when appropriate. |
| Published | Krevaya recorded successful delivery. Open the destination link to inspect the live post. |
Detailed instructions
- Write, revise, approve, and reject posts
- Schedule posts, set posting slots, and pause publishing
- Choose supported post formats and media limits
- Understand posting limits and fair use
- Fix held, failed, and stuck publishing posts
- Publish articles and newsletter drafts
- Publish to communities, chat channels, and the fediverse
Deliver a resource from an Instagram or Facebook comment
Convo connects a trigger, a connected account, and a message flow. Select the post and keyword, set the real resource URL, preview the messages, and enable the intended sending behavior. A flow’s enabled switch and the brand’s sending mode are separate controls.
- WHERE
- Convo → Automations · Inbox · Connected accounts & delivery
- ACCESS
- Manual flows and inbox: Essentials and up. AI answer steps require an AI plan.
Which Auto DM setup should I use?
| Starting point | Use it when | What to verify |
|---|---|---|
| Auto DM on a creation or post | A keyword and resource belong to that specific post. | The post, HTTPS resource, message preview, and explicit automatic-sending choice. This setup can deliver the resource in the first private reply. |
| Convo → New automation | You need reply buttons, questions, conditions, or handoff. | Account, post scope, step connections, and sending mode. A two-step flow can wait for a reply-button tap before sending the link. |
For a custom flow, choose Comments on a post or Reel, the platform, connected account, and keyword match. Select the intended posts. An empty post selection can match every post, so do not leave it empty when the offer belongs to one campaign. Comment triggers default to once per person per post.
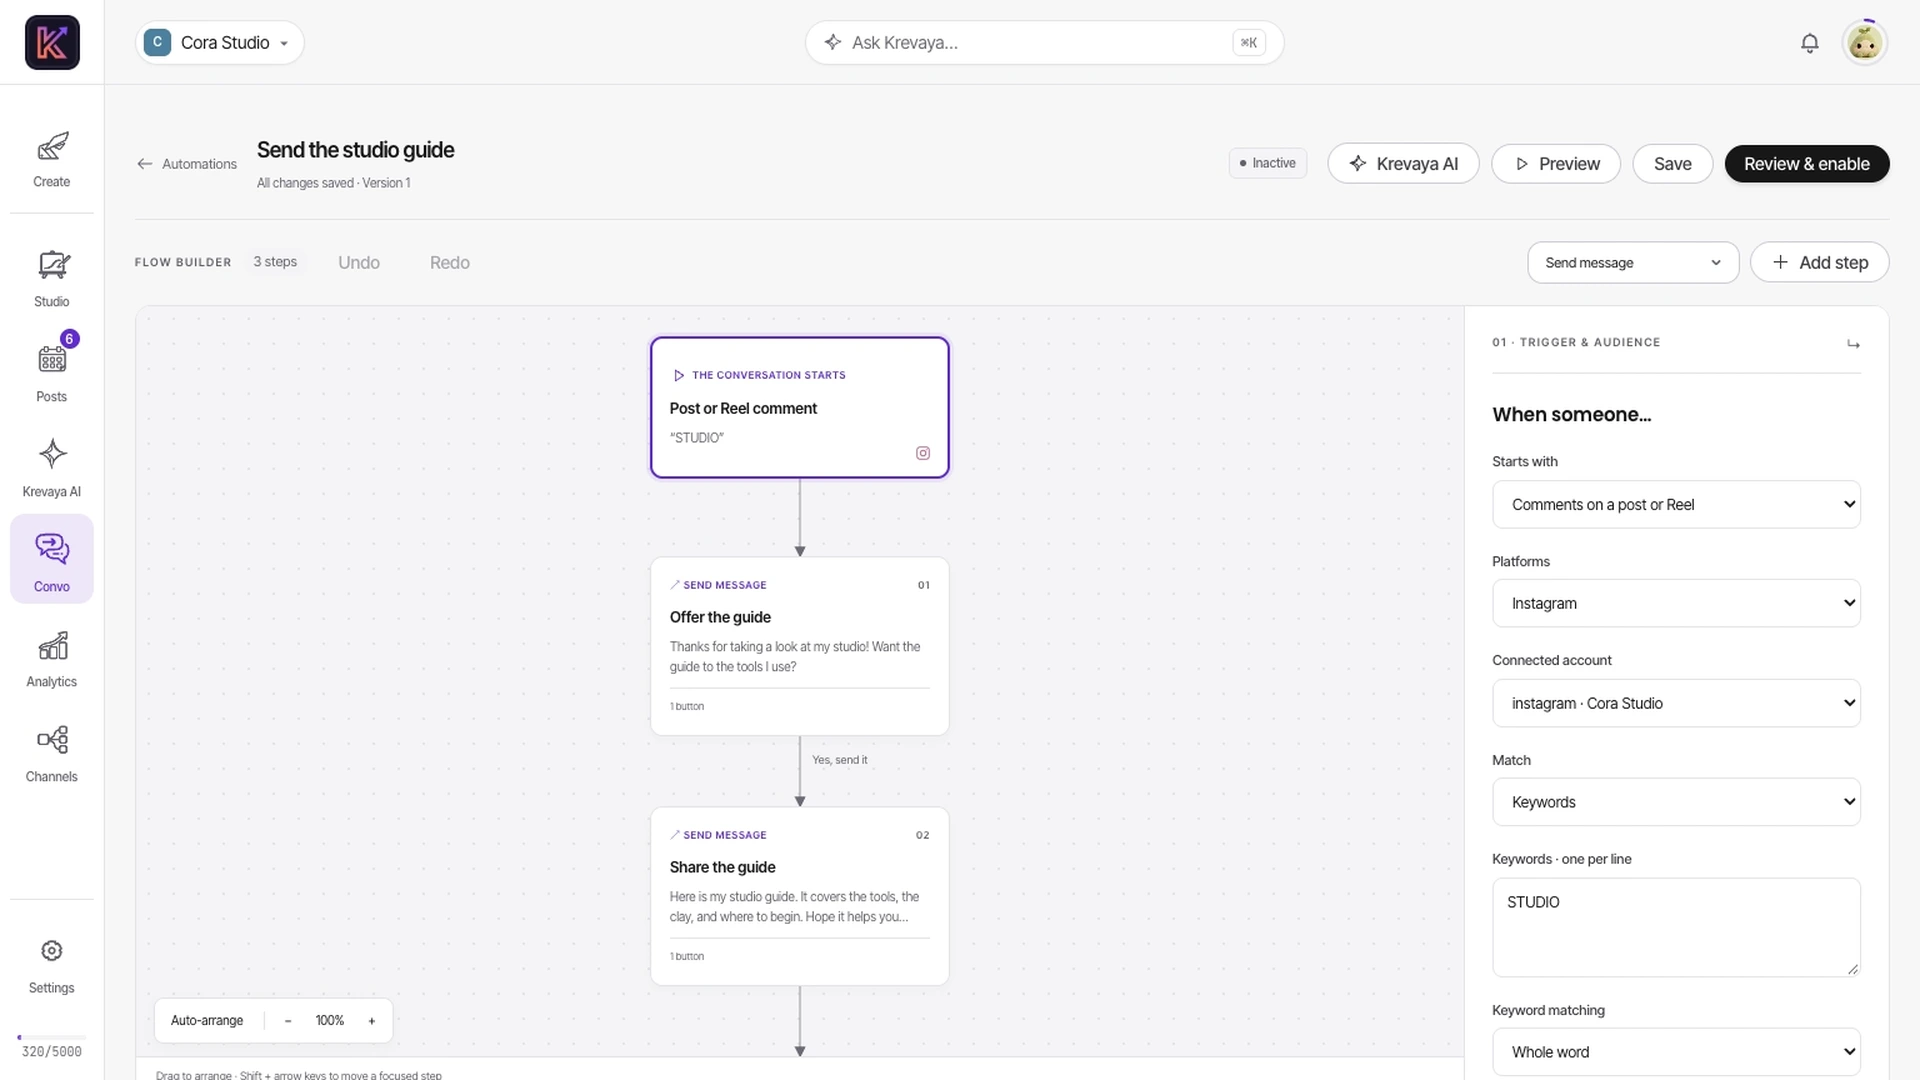
Why does a GUIDE flow wait for a button tap?
The person comments GUIDE.
The trigger checks the keyword, account, post scope, and repeat rule. An enabled flow can still queue for approval under Review sending mode.
The opening private reply arrives.
A two-step flow might say “Tap below and we’ll send you the Krevaya guidebook.” Its Send the guidebook button must be a reply button connected to the next step.
The person taps the reply button.
The flow advances to the resource step. An Open the guidebook URL button can send them to https://go.krevaya.com/guide. Clicking a URL is not the same event as replying to the conversation.
When does an enabled flow send automatically?
| Mode | New flows | Existing conversations |
|---|---|---|
| Review | Queue for owner approval. An Auto DM explicitly authorized for specific posts can start automatically for those posts. | An explicitly approved conversation can finish. |
| Auto | Enabled, matching flows can start automatically. | Continue while their sending conditions remain valid. |
| Off | Do not start. | Stop before the next step or send. |
Preview checks the conversation without sending a message. Review & enable validates the flow. Check Connected accounts & delivery for the account’s permissions and delivery setup; a successful publishing connection alone is not proof that messaging delivery is ready.
What to check when the test comment did not deliver the guide
| What you see | Check this next |
|---|---|
| No new conversation | Keyword, account, post selection, enabled state, sending mode, and whether this person already triggered the flow on this post. |
| Queued for review | Approve the intended conversation, or deliberately configure automatic sending. |
| Opening message sent; resource waiting | Whether the recipient tapped the connected reply button. Check DMs and Message Requests on the recipient’s account. |
| Waiting for a messaging window | A fresh eligible inbound message or reply interaction is needed. An outbound link click cannot open the window. |
| Paused or handed off | A personal reply, pause, opt-out, or handoff can stop automation. Inspect the contact in Inbox. |
| An old message appears after an edit | Existing conversations keep the flow version they started with. Saving a new version changes future runs. |
A sent log confirms Krevaya recorded a send; it does not prove where Instagram or Facebook placed the message. Inspect event and send timestamps rather than assuming delivery is instant. Pausing a flow cancels unfinished runs; sending a personal reply pauses automation for that contact.
How do I collect answers or hand off to a person?
Add an input step for text, choice, email, phone, or a number, then connect its success and fallback paths. Saving an email or phone number does not grant marketing consent. Use an explicit consent question when needed. STOP or unsubscribe stops automation; START does not silently create email or SMS consent.
Inbox holds conversations, assignments, and private notes. A handoff can go to an eligible Can publish teammate with a seat. The owner or an eligible publisher can resume it. Contacts retains collected answers; Reports helps you inspect starts, completions, and link requests.
Read the evidence behind your next publishing decision
Analytics reports the metrics available from your connected accounts. Choose the brand, account, and date range before comparing posts. Best times uses engagement history and initial industry priors; Radar compares tracked accounts against their own recent performance.
- WHERE
- Analytics → Performance · Benchmarks & Radar
- ACCESS
- Analytics and best times: Essentials · Radar: Plus and up
Which numbers can I compare?
Select a comparable period and format.
Start with the same account and a similar set of posts. Open the underlying posts instead of treating a high average as the explanation. One breakout or paid campaign can change a weekly total.
Check missing values.
An unavailable metric is not zero. New connections, collection delays, permissions, and platform coverage can leave gaps. A channel that can publish through Krevaya may not expose every metric.
Choose one change to test.
For the ceramics example, compare an introduction post with a process post. Use the actual reach, replies, or other available outcome you care about. Record whether the topic, opening, or format changed before concluding what caused the result.
What changes when I apply Best times?
Open Analytics → Performance and find Best times to post. Inspect the platform, suggested hours, and sample information. Apply to my schedule replaces that platform’s posting times for the active brand; it does not mean that every existing scheduled post was moved. The action is refused while that platform’s posting limit is 0.
Use best times on a channel’s schedule card in Settings → Publishing fills suggestions for you to edit before saving. Keep explicit times for launches and events. Suggestions based on a small sample can move as new posts are measured.
What counts as a Radar breakout?
Radar checks tracked accounts every few hours. A breakout can be around three times that account’s recent average engagement, with a minimum engagement threshold and usable post data. It is a comparison with that account’s baseline, not a promise about your own results. Threads snapshots do not supply the post metrics needed for these alerts.
Ask Krevaya AI for your latest weekly audit when one exists. It is written after a completed week during an eligible scheduled drafting run, rather than generated by merely opening Analytics. Off publishing pauses those scheduled runs. Use the audit’s suggested fix alongside the measured results.
Publish the destination you put in your profile
Each brand can have a public Link in Bio page at mykrevaya.com/yourname. Add that brand’s destinations and social profiles, publish the page, and inspect its public address before using it in a social profile.
- WHERE
- Link in Bio for the selected brand
- ACCESS
- An active plan is required to publish changes.
How do I create and publish the page?
Choose the brand and an available username.
Open Link in Bio for that brand. Write a page title and description that identify the business or creator. Choose the light, dark, or brand theme.
Put the current destination first.
Use a label such as “Read the ceramics care guide” rather than “Click here.” Add relevant social profiles. A page supports up to 30 links and 12 social profiles; latest posts can show up to six recent published posts.
Publish, then open the public page.
On Free, a new page and later changes go through review; the last approved version stays public while an update is pending. Paid plans publish changes immediately. Check every destination on the actual mykrevaya.com page.
Does turning off search visibility make the page private?
No. Search visibility asks search engines not to index the page. The public URL remains reachable. Keep private client information, unpublished offers, and internal documents out of the page and its destinations.
Use go.krevaya.com/guide when sharing this handbook. A brand’s mykrevaya.com page is a separate destination you configure for its own audience.
Detailed instructions
Separate editing, client approval, and publishing access
Can edit lets a teammate work on shared creations; Can publish adds post approval, scheduling, and publishing. Client review links collect feedback without giving the client a workspace role. The effective role also depends on available editor seats.
- WHERE
- Brands → People · Posts → Client review · Settings
- ACCESS
- Check the collaborator’s effective role and the workspace’s available seats.
Which permission should I give a collaborator?
| Access | Work it allows | Editor seat |
|---|---|---|
| Can view / Can comment | Inspect shared creations; commenters can leave feedback. | Not required. |
| Can edit | Edit and comment on permitted shared creations. | Required. |
| Can publish | Edit creations and approve, schedule, or publish the brand’s posts. | Required. |
| Admin | Manage eligible people and workspace billing, with creation editing access. | Required; not platform-administrator authority. |
Invite from the brand’s People controls and have the recipient accept with the intended account. Invitations do not reserve a seat. Without a seat at acceptance, an editor, publisher, or admin assignment can operate as Can comment. Check the effective role rather than relying on the invitation label.
Shared with me is the recipient’s entry point. A Can publish teammate uses the shared brand’s Posts view and the owner’s connected accounts. An editor’s media access is limited to that brand, not the owner’s other brands or unfiled Library items.
Does a client’s Looks good decision approve the post?
No. In a post’s details, Client review → Share for review creates a link someone can use without a Krevaya account. They can comment, choose Looks good, or request changes. The decision notifies you but does not change the post’s publishing status. You still approve and schedule it. Rotate link replaces access; Revoke link turns it off.
Which plan do these workflows need?
| Workflow | Starts on | Important distinction |
|---|---|---|
| Write and schedule your own posts | Essentials | 25 connected accounts and publishing within per-platform fair-use caps. |
| Studio, manual video export, Lineups, Analytics, and manual Convo flows | Essentials | AI is disabled. Typed captions and human-written messages remain available. |
| Krevaya AI, AI edits, Routines, Radar, MCP, REST API, and webhooks | Plus | Generation uses credits; integrations still need permission. |
| Auto cut | Pro | Daily source-minute and run limits apply, alongside credits. |
| Trending | Ultra | A higher plan does not unlock unavailable or preview-only features. |
Check Settings → Plan & billing for your plan, usage, and storage. AI credits, media storage, editor seats, and publishing limits measure different things. A posting hold is not automatically solved by buying AI credits. The pricing page lists current prices and allowances.
Connect another tool to a specific Krevaya task
MCP gives compatible assistants access to Krevaya tools; the REST API and webhooks support custom integrations. Start with a scoped connection and one brand. Read the result in Krevaya before expanding a workflow that can schedule or publish.
- WHERE
- Settings → API keys & MCP
- ACCESS
- MCP, REST API, and webhooks: Plus and up
Should I use MCP, the API, or the browser extension?
| Interface | Use it for | First check |
|---|---|---|
| MCP | An assistant reading drafts, creating content, or using authorized scheduling tools. | Use the documented sign-in flow or scoped API key; select the intended brand. |
| REST API | A repeatable integration in your application, n8n, or Make. | Start with an authenticated read, then create a draft and inspect it in Posts. |
| Webhooks | Receiving events such as a publishing result. | Verify signatures and make processing safe to retry. |
| Browser extension | Capturing source material for later work in Krevaya. | Choose the destination and inspect what was captured. |
Apps with access shows active authorizations and API keys with their names and last use. A key name is the supplied label, not proof that Krevaya identified the software using it. Review permissions and revoke access you no longer need.
Can an integration schedule a post directly?
An authorized API request can schedule a post, including when creating it with a scheduling time. Do not assume every external write is only a draft. Pinterest and Tumblr retain individual human approval. Required channel fields, feature access, and publishing limits still apply.
Read before writing.
Confirm the brand and connected account returned by the integration. Keep API keys in your application’s secret storage, not in public page code.
Create one draft and inspect it.
Check caption, media, destination, and status in Posts. Inspect editable creations in Studio. An accepted job may still be running; use its result rather than immediately submitting a duplicate.
Handle errors and delivery results.
Use the error-and-limits reference for rate limits and retries. Inspect held or failed posts and process publishing webhooks. The REST, video, and GraphQL beta references cover their distinct payloads.
REFERENCE & SUPPORT
Keep the guide beside your workspace
Use the chapter links to share a specific answer. For an account problem, include the affected post or creation link and the exact message you see when contacting support.